Showing posts with label cooking. Show all posts

Wednesday, December 30, 2009

Just Soup

It's been a while since I've posted anything resembling a recipe, so I'm going to fit one more in before we finish out the year.

Before that, I would like to apologize for our lack of a Christmas post. I hope everyone enjoyed their Christmas! Ours was really nice. Nat had to work during the day, but we hosted a potluck with our English conversation group for dinner. Nat made meatballs and her pizza bread. I made my tomato bisque, with some minor alterations (addition of some finely chopped mushrooms and substitution of one Japanese leafy vegetable for another). We still haven't sent out our Christmas gifts or cards yet, but know that they will be on their way...someday.

There was lots of good food at the potluck. As always, there were leftovers, which are just as delicious!

The next few days were mostly lazy, on our part. Yesterday, I walked to the local convenience store to pay the internet bill. You can pay your bills at the convenience store! Isn't that convenient? You can also pay for Amazon.com orders at certain convenience stores and have packages shipped there as well. Amazing! I ended up being lazy the rest of yesterday and buying dinner at the convenience store as well.

Today, though, I made soup. It's somewhat my generic soup, but we had some kumquats on hand and I decided to use a few to flavor the broth (mmmmm!). As long as you keep a regular stock of tomatoes, onions, garlic and keep your spice cabinet stocked like I do, all you should need to leave home for this are the kumquats and some sort of base. If you don't keep some sort of soup base on hand, that is. If you do, all you'll need are the kumquats.

The result is a delicious bowl of soup!

Just Soup
(Today's variation includes kumquats!)
(feeds 3 or 4)
Ingredients:
  • 1 Tomato, peeled, diced and mashed
  • 1/2 a medium onion, chopped fine
  • 3 cloves of garlic, chopped up however you like to chop up garlic (I like the bell-shape you get from slicing it, but Nat likes to smash it for stronger flavor. I go back and forth between methods. If you like, you can too!)
  • 5 Kumquats, washed (if you have extra, you can eat them whole - peel and all)
  • Soup base (I used 2 chicken "consomme" cubes which are quite a bit like bouillon cubes, but you could easily replace it with a can of broth or some sort of vegetable soup base.)
  • Olive oil
  • Water
  • Salt - to taste
  • Pepper - to taste
  • Ground sage - to taste, though I think I used about a teaspoon...I think
  • 1/2 tsp. Turmeric
  • Oregano - a couple dashes
  • A good pasta for soup (smaller pastas like orzo or alphabet noodles are best, but spaghetti or angel hair can work if you break the noodles down into small pieces before adding them to the soup)
Directions:
  1. Make sure you're thinking loving, happy thoughts. This soup needs to be made with love, even if it's not in the ingredients list.
  2. Peel two of your kumquats, mash and remove the seeds. Add the kumquat juice and pulp to your mashed tomato and set aside.
  3. Saute your onion and garlic in olive oil until they start turning brown (I usually do this in my soup pot to cut down on dirty dishes).
  4. Add mashed tomato and kumquat to the pot, stir a few times and start adding water. I usually use the adding water step as an opportunity to clean out my ingredient bowls and not waste the last bits (get the last of that delicious mashed tomato off the sides and into the soup!). I just fill up my pot to a reasonable level, but since there are several types of cooking pots out there, I doubt that is going to help you much. This recipe should make three bowls of soup, so use as much water as would fill three and a half bowls (to allow for evaporation and pasta absorption). You can always add more if necessary. If you are using a liquid soup base, use that much less water.
  5. Bring to a boil.
  6. Slice two crosses into each of the three kumquats you have left. The cuts should be just deep enough to cut beyond the peel and each cross should be on opposite sides of the fruit. Add these to the soup.
  7. Add salt, pepper, sage, turmeric and oregano and let cook for about five minutes and taste the broth to see if you need to add anything. (I keep a small sauce dish on hand for this purpose).
  8. After you have the flavor right, add your noodles and continue cooking until the noodles are tender.
  9. Remove the three whole kumquats.
  10. Serve and eat.
  11. Do NOT spill all over the counter!
Okay, so you may spill it all over the counter if you really have to, but just remember that you're going to have to clean that mess up.

I didn't spill this soup, but last week's chicken noodle was almost a waste.

I shall leave you with a picture of Toshiko and me from our Christmas party. Toshiko's the one in Christmas socks.

Friday, November 27, 2009

Thanksgiving in Japan

As American Thanksgiving comes to a close in America (it's already after noon on the day after here), I am finally getting around to typing a post. We've been busy with one thing or another, so I'll try to get you all updated.

Before that, here's our Thanksgiving dinner:

We don't get turkeys in Japan (unless we're looking to order one to be delivered) and even if we did, we don't really have the microwave space to cook it in. We did learn how to use our microwave as an oven, though. Apparently, you can put metal in the microwave when using the oven settings.

Our meal consisted of chicken, corn on the cob (from Hokkaido, Japan's northern-most island...where all the wheat, corn and cows grow), a butter croissant and mashed potatoes with creamy chicken-mushroom dressing.

It was just the two of us, so this was more than enough food. After dinner, Toshiko visited for tea and sweets.

Monday was Japanese Labor Thanksgiving. It's not a major holiday, but Nat had the day off. One of her coworkers (who also happens to be our neighbor) went fishing earlier in the day and offered some of his fish to us. The three near-identical looking fish are horse mackerel and the reddish one is sea bream. The sea bream's fins are spiny and it has sharp teeth.

This was my first time to clean or fillet a fish. I think I did pretty well, but I know I could have done a lot better. The first day, we ate two of the mackerel. I made a mixture of yellow miso paste, crushed garlic, grated ginger and sake. I spread the mixture over the fillets and pan fried them for a couple minutes, flipped 'em, fried them for a minute more and they were done! Mmmm!

The next day, we ate the other two fish. This time, I rubbed salt, pepper, paprika and thyme into the fillets and marinated them in olive oil and sake (white wine would work just as well, but all we had in the house was red wine and sake). They only need to marinade for half an hour to an hour. If you have other things to prepare for the meal, just let them marinate while you get everything else ready. Chop up half an onion and some garlic and start frying them in some alive oil. Place the fillets on top of the garlic and onions, skin-side down. Fry for two to three minutes and flip for one last minute. Delicious.

Sunday, we went hiking to see a waterfall near Miyazu with some of the English conversation group members. I'm sorry to say we forgot to bring our camera, so you won't be able to see how awesome it was (unless Nat gets the pictures off of her cell phone). Afterward, we went to lunch and did some shopping.

Saturday (yes, I'm taking you backward through time), Nat made spaghetti carbonara and we invited another one of Nat's coworkers (also our neighbor) over for dinner and movies. I made garlic bread and a salad. We watched Foster's Home for Imaginary Friends and Moulin Rouge.

I think that's all of the things that we haven't had a chance to tell you about yet. They're not huge events, but they're what's been keeping us busy for the past week. Tomorrow, we're going to see an exhibit of wood block prints. I'm excited.

Obviously, since American Thanksgiving isn't celebrated in Japan, Black Friday doesn't exist here, either. It also helps that Christmas isn't nearly as big of a holiday as it is in the west (though they do celebrate it...with KFC and cake, from what I'm told; apparently, western holidays are supposed to be celebrated with western food). I went shopping today just because I could do it without fear of being trampled or mugged in the parking lot. Be safe, everyone!

I hope you all had a wonderful Thanksgiving and we are both very thankful for all of you!


Mexican dahlias
(These are much taller than me.)

Monday, November 16, 2009

I Sing The Snooze Button Electric

Lately I've been having a ton of trouble waking up. I've got this habit of smacking the snooze button about four times before actually waking up and then zooming around the house, grabbing a piece of toast, and absolutely trucking to school on my bike in the span of ten or twenty minutes.

Last night, I went to bed late; around 12. I was a little worried about what would happen in the morning. My snooze duration is about 5 minutes long, so I set it to be 10 minutes instead.

The difference was incredible. My alarm went off at 7:00 as it usually does, and I smacked the snooze button. The next ten minutes, I was actually able to relax and wake myself up. It seems like when there's only five minutes I spend the whole five minutes frantically trying to relax, all the while knowing it's going to go off again any minute, but with ten minutes it actually seems like a fair amount of time to snooze. When I got up, I wasn't tired and didn't have to rush too much. It was amazing.

Sunday we had the cooking party with four ladies from Eikaiwa - Toshiko, Sanae, Mieko, and Keiko. We had a ton of fun. Toshiko and Mieko both brought salads, and Mieko also brought us some strawberry saplings! We'll have strawberries next year if I don't murder them horribly! I made spaghetti carbonara according to my mom's recipe. I want to make another batch of it soon and bring it to school for bento for a little while, since, amazingly, the six of us ate the whole pan of it (and believe me it makes a crapload of spaghetti). Of course, we were full as all, but...

The new student is really cute and sweet. Luckily her assistant teacher DOES speak English, and actually owns the import store in Omiya! She's super nice, too. The students are being really nice to the new student as well, so I'm happy about that - Japanese schools are known to have bullying problems sometimes....

Hm, I think that's all I have to update about.

Tuesday, November 3, 2009

Kotatsu and Clear Soup with Japanese Clams

Today, I armed myself with new recipes and went to the grocery store. I was determined, today, to prepare some sort of seafood for dinner, be it octopus, clams, mackerel or ishitai (striped beakfish). Luckily, I had little choice in the matter, as most of the other aisles were still being stocked. There wasn't any ishitai (it's not one of the most common fishes we get here, but I see it in the grocery store once every few weeks). We can't get some of the ingredients for the octopus recipes I had on hand (dill or cloves) so I put that on hold until I can figure out some good substitutions. Mackerel was...well, I forgot my list of fish names written in kanji (the Chinese characters in the Japanese writing system), so I couldn't tell what fish was mackerel. We'll try this again some other time. Clams it was. I also managed to pick up a small bag of bay leaves. They were actually at the store this whole time, but I only just realized what they were. Part of the problem was that they were labeled in French, since the Japanese borrowed the French name of the herb (laurier). For those who don't know, a bay tree is also known as a laurel. I have been aware of the dual name of the bay/laurel for a long time, so I felt a little foolish that I hadn't realized what "laurier" was earlier. Especially since there was a picture of the leaves on the bag.

After dropping my groceries at home, I grabbed an umbrella (it's started to rain) and headed back out to go to our household goods store, Komeri. I picked up a cord for our kotatsu. A kotatsu is a low table with a heating element underneath. The top of the table is removable so that you can place a kotatsu blanket over the rest of the frame to keep the heat under the table. People then sit with their legs under the kotatsu to keep warm in the colder months. We have two of these. We didn't have any cords for either of them. So I picked one up and headed home. I would have bought two, but I wasn't sure if I had the right thing just yet.

On the way home, the sun was shining, and I tried a different route. Walking by the bay, I saw some flying fish jumping out of the water. It was pretty cool. I didn't have the camera with me (Nat had it for English recitation competition, which she may or may not write up a blog about later), but I have some pictures from the last time I was by the bay. Today was definitely more photogenic

When I got home, Nat was there! Yay! Apparently, today is some sort of holiday and her only duty at work was to attend the English recitation competition. So work was only a half-day!

Today's dinner was Japanese pumpkin cooked like acorn squash (that recipe with the brown sugar and butter and sometimes walnuts), clear soup with Japanese clams and sushi (if you get to the grocery store early, you can buy whole, uncut sushi rolls for much cheaper than the pre-cut ones).

For the soup, I basically used the recipe by Setsuko Yoshizuka at About.com, except I used green onion for the "garnish" and added some grated myoga. Mmmm! I spilled a little too much sake in it, but it was still pretty good.

For those wondering what myoga is, it's this stuff to the left, here. It's the sort of flower bud/sprout thing. Not the clams. It's sometimes called myoga ginger or Japanese wild ginger. I don't know if it's actually related to ginger or not. For the soup, I grated it really fine and let it simmer in the broth.

Supposedly, much of the myoga plant is toxic, but this part is considered safe. Still, I'm told that telling someone that they eat too much myoga in Japan is like asking someone if they ate paint chips as a child in the USA. We're going to play it safe and only eat a little bit...rarely.

We found a casserole dish. I don't really know why it's here. It doesn't fit in our microwave. We don't have an oven. I can't wait until I know how to get to the thrift store (or "recycle shop", as they call them here).

Friday, October 30, 2009

Persimmony Rice Pudding

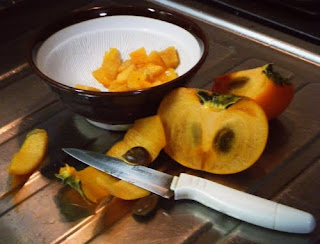
It worked! I made some persimmon and rice pudding, adapted from some stove-top rice pudding recipe I discovered somewhere on the vast internet sea. This means it's time for another recipe post!


Persimmony Rice Pudding
(Adapted from some recipe somewhere else

that had no persimmons in it at all)

Ingredients:
  • 3/4 cup White Rice, uncooked (If you can get your hands on it, I highly suggest mochi rice, as it's texture lends itself best to rice pudding)
  • 1 1/2 cup Water
  • 2-3 ripe Persimmons (Note that if the persimmon is somewhat dark inside and has a lot of grainy-looking dark spots, this is actually a good thing. This is actually an indicator that it is ripe.) *Edit: After a second go at this, I would say that three normal-sized persimmons or four small-sized persimmons are good, plus an extra persimmon for garnish.
  • 2 cups of milk (You will use 1 1/2 cup and 1/2 cup separately)
  • 1/3 cup Granulated sugar
  • 1/4 tsp Salt
  • 1 Egg, beaten
  • 1 Tbsp Butter (I'm tempted to say that butter is optional, but I haven't tried it without, so I can't say for certain)
Optional Ingredients (I do not recommending using these all together, they are each their own variation):
  • 1/2 tsp Vanilla (optional)
  • 1/2 tsp Ginger root (optional)
  • Nutmeg
  • 1/4-1/3 cup Raisins
Directions:
  1. Peel, deseed and cut one or two persimmons into small cubes. Whether you use one or two depends on how strong you want the flavor to be. Either way should taste good.
  2. Mash the persimmon. You may use whichever method to do this you prefer. I use a mortar and pestil, but I realize that this is a long and tedious process that many people do not have the time or patience for. That, and many people don't own a mortar and pestil. You can also use a food processor or a blender. Whatever makes it look like orange slime works. *Optional step: If you are adding ginger to this recipe and you are using fresh ginger root, add it here and get it all properly mashed up along with the persimmon.
  3. In a pot or saucepan that you think can handle 4 or more cups of this stuff, bring the water to a boil. Add the rice and mashed persimmon. Reduce the heat and allow it all to simmer for 20 minutes.
  4. Stir up the rice mixture. Add 1 1/2 cups of milk, salt and sugar. Stir and cook over medium heat until it is thick and creamy. This may take another 20 minutes, it may not. It all depends on how cooperative your mixture feels. *Optional step: If using raisins, add them here. I abhor cooked raisins, so I will never be using this step. But some people like them, so this step is for those people. If you are using powdered ginger, add that here as well.
  5. Slowly stir in the leftover 1/2 cup of milk and the beaten egg. This is more important for the egg than for the milk, as the egg will start cooking immediately and you want to get it as evenly mixed into the pudding as possible. Also, you may wish to turn down the heat a little at this point, so as to keep the pudding from popping out at you.
  6. Continue cooking for another two minutes while you STIR CONTINUOUSLY. Don't stop. Really.
  7. Remove from heat and stir in the butter. *Optional step: If you are using vanilla, now is the time to add it.
  8. Dish the pudding up. Peel, seed and cut up your second (or third) persimmon into small pieces (strips, cubes, little hearts...you choose!) and place them on top as garnish or put them in a bowl for people to add as much or as little as they want to their own pudding. Heck, do both! *Optional step: If you are using nutmeg, sprinkle it sparingly over the top of each serving before adding the persimmon garnish.
That's it! This recipe should feed at least five people. Unless you eat a whole, freaking lot. In which case, shame on you! You should have saved some for the others!

Dinner itself was a mishap (a delicious mishap, but a mishap nonetheless), but that was due to my being distracted by the pudding when I should have taken some noodles off the burner, resulting in some very mushy yakisoba. Mmmm...mushy yakisoba.....

Friday, October 16, 2009

Creamy Pesto Farfalle with Chicken and Broccoli

So, I finally made dinner with my purchases at the import store. I call it creamy pesto farfalle with chicken and broccoli, but the cream sauce and the pesto sauce weren't mixed at all (though you could probably mix them, if you wanted). I messed up a little, but it still turned out alright.

Creamy Pesto Farfalle with Chicken and Broccoli
Ingredients:
  • Chicken breasts (de-fatted, de-skinned, about as many as you would have people to serve, though larger breasts or smaller eaters may allow for changes)
  • Farfalle pasta (enough for however many people you're feeding; substitute other pastas as you feel the inspiration)
  • Pesto
  • Broccoli (one small head feeds two people...heads in America are rarely "small"; cut into bite-size florets)
  • Flour
  • Salt
  • Black Pepper
  • Thyme (ground or crushed)
  • Olive Oil (again, I don't like Extra Virgin since I find it bitter, but you might enjoy it)
  • 1/2 Onion, diced
  • 3 Cloves Garlic, minced (not crushed)
  • Lemon juice
  • Shredded parmesan
Cream Sauce:
  • Butter (I forget exactly how much, maybe half a stick? Salted butter is probably best, but I have no idea what kind I used and it worked fine.)
  • Flour
  • Milk
  • 1 Beef or chicken Boullion cube (optional, I didn't use it this time...you'll also need some celery salt if you do this....and, very important, unsalted butter)
Directions:
  1. Tenderize the chicken. If a piece looks like it might be too thick to pan fry, keep a knife, plate and fork handy while you're cooking so that you can cut it into slices near the end.
  2. Start cooking the farfalle according to directions. Add a little olive oil to the water in order to keep the pasta from sticking to the pot while you are busy with the chicken.
  3. Mix flour, salt, thyme and pepper together in a wide dish. Place the chicken breasts in the dish and flop them around until they are well coated with the flour.
  4. Put some olive oil into a frying pan (keep the bottle handy, you may need to add more as the flour will absorb some), heat the pan and add the chicken, onions and garlic. (This is one place I messed up. I sauteed the onions and garlic first, then added the chicken. I ended up burning the onions. Hopefully adding them at this point won't result in failure. )
  5. Turn the chicken fairly often, making sure it doesn't get much more than a golden brown. Somewhere in the middle of cooking, add about a capfull (or half a capfull) of lemon juice over each chicken breast. Add more oil as necessary, since it will absorb into the four and onions. Once the chicken is looking done, feel free to slice open a thicker part of the chicken and check if it is done. If not, slice the chicken appropriately and return to the pan just long enough to finish it up.
  6. At this point, the pasta should be done, so go ahead and drain that.
  7. Refill the pot with just a little bit of water, add the broccoli, cover and place over low heat. Once the broccoli is a bright green, wait half a minute and take it off the heat and drain.
  8. Place the pasta into bowls or onto plates (bowls is probably better, if you have pasta bowls), add the broccoli.
  9. In a sauce pan/pot melt the butter. Once melted, add flour and stir. Once well mixed, add milk (and bouillon cube) and stir until thickened. If it's too thick, add more milk. Remember how much pasta this has to spread amongst. If it looks like you don't have enough, try adding more flour and milk (I've never had to do this, so I don't know if it works. Tell me how it turns out, if you try it!).
  10. Once the sauce is ready, you may either mix in the pesto or add both to the pasta separately.
  11. Slice the chicken into short strips and place on top of the pasta.
  12. If you didn't burn the onions and garlic too badly, drain them and pat them with a paper towel. Add them to the pasta. (Also, please tell me if the alterations in this step worked!)
  13. Add shredded parmesan
  14. Yay!
So, that's that. Even with blackened onion bits, it was delicious.

Tuesday, September 22, 2009

Goya: Round II

So, Nat got a goya (bitter melon) from one of her co-workers on Friday. This meant I had to, once again, face off with the bitter menace. However, this time I was armed with the knowledge of true Japanese preparation methods. I had the upper hand! Last time, goya simply caught me off-guard. This time, I was ready.

The battle was epic. No one was spared. Not even the children. In the end, I stood victorious over a delicious (and only slightly bitter) bowl of goya champuru. I was pleased. Goya is reported to be highly nutritious, so being able to incorporate it into our diet and still enjoy it was a great success.

I'm sure you're now wondering what to do if you ever come across a goya. If you do happen to stumble upon a bitter melon (which would be quite impressive, for some areas of the United States) I advise that you never cook this for a guest on your first try. Since goya is so bitter, you may need practice with it before unleashing it on your friends in order to more fully understand the needs of the vegetable. Got that? Good. With that said, here's a recipe for two (adapted from an out-of-print, English-language magazine published in Kyoto):

Goya Champuru
(Note: This goes very well over Japanese steamed rice.)
Ingredients:
Goya (bitter melon)
1 - Cut the goya in half, lengthwise, and remove the inner pith and seeds with a spoon (or your fingers, like I do). Then, slice the halves into very, very thin half-moons. Rinse the slices in a bowl of salty water. Gently scrunch the goya to release some of the oils. Drain and repeat. You might even want to steam/boil the goya before adding it to this recipe.
Tofu 1 block - Place a paper towel on a flat dish or cutting board and place the tofu on top. Place another dish or cutting board on top of the tofu as a weight and set aside for 10 minutes. This will allow the tofu to drain. Once done, use your hands to crumble the tofu (do not cut it, since the texture is intended to be crumbly).
Onion 1/2 - Chop the onion up. The size of the pieces can be however you like, really. Just as long as you want to eat it in the end.
King Trumpet Mushrooms 3 or 4 - These might also be called Eryngii, Eringi or King Oyster Mushrooms. Slice these into sticks. If you wish to substitute other edible mushrooms, that should be fine.
Soy Sauce to taste
Mirin to taste - This is a sweet rice wine used solely for cooking. If you've managed to get your hands on a goya, you should be able to find this. Just talk to your grocer.
Katsuo
flakes - This is another thing that may be difficult to come by in some parts of the world. It's a mix of things, not the least of which are dried fish flakes. Very delicious, very important to this dish. If you've already got the goya and the mirin, you'll likely be able to get this too.
Eggs 2, scrambled
Cooking oil 1 Tbsp

Directions:
  1. Place a frying pan over high heat, add the cooking oil. Then add the crumbled tofu and onion. Fry the tofu. Fry the tofu until it starts turning brown. (This is what my recipe says. However this has never happened for me. Either my pan doesn't know how to brown tofu or I'm just impatient. At least fry the tofu until any leftover moisture is gone.) Turn the heat down to medium and continue frying the tofu until it is evenly brown.
  2. Add the goya and the mushrooms. Fry these FOREVER! The goya, in time, should turn translucent. The recipe I have warns that stirring the goya too aggressively may make the entire dish bitter. I never had a problem with this, but you may want to keep it in mind.
  3. After the goya has cooked for a little while, go ahead and season with soy sauce and mirin. you may be more liberal with the soy sauce, but be a bit conservative with the mirin as you want it to flavor the dish and not sweeten it. Also give a generous sprinkle of katsuo flakes.
  4. Once the goya appears to be cooked to a limp death, pour the egg over the mixture in the pan and stir quickly to get the egg cooked evenly. Immediately remove from heat and serve over freshly-steamed Japanese white rice. Mmmmmmm!


On that note, it appears that my entries are going to be primarily food-based. Hopefully, most people will be able to try these recipes at home (though the ingredients for this recipe might prove to be a scavenger hunt for some). If I feel ambitious enough, I might start taking pictures of food and ingredients as I prepare (also, we need new batteries for the camera...). I'm going to need a small clipboard next to the counter so I can take measurement notes while I'm cooking.

Also, use for mochi rice #56: Soup thickener - Since mochi rice has such a high starch content, it releases its starches into any soup you might be cooking and acts as a thickener. You only need a little bit of mochi rice for this to work. If you have a soup recipe that includes rice, I suggest using a 3/4 the amount of normal rice and use mochi rice for the remaining 1/4. Adding a tablespoon or two of mochi rice to a vegetable soup recipe can work too!

Friday, September 18, 2009

Yes. Yes, I did make hamburgers.

As Nat has just mentioned, I indeed made hamburgers with spinach and rice last night. The hamburger was mostly Australian beef (most beef is imported in Japan, save for a few heads of cattle who are treated like kings...until they are slaughtered) and American pork (I 'anno...). It was seasoned with fresh crushed garlic, salt, black pepper, oregano and a dash of soy sauce. I mashed the avocado up with some lemon juice in my handy-dandy mortar and pestle and used it as a spread. There was also sliced tomato and mayonnaise involved. While the concept of hamburgers is not unknown to the Japanese, I've only seen instances of a open-faced hamburgers when cooked at home (McDonald's and MossBurger still serve the traditional style: both top and bottom of the bun).

The spinach and rice was a little trickier. Earlier, I had accidentally bought mochi rice instead of normal Japanese rice. Mochi rice (sometimes known as "sweet rice") is slightly sweeter, a little lighter and a whole lot stickier than the rice normally used for a Japanese mealtime....and regular Japanese rice is already a lot stickier than rice normally found in Western cuisines. Normally, mochi rice is pounded into a sticky "mochi" (a rice dough or cake) which can be used for a variety of things. Typically, mochi is used for holiday cakes or traditional tea sweets called "manju". Very delicious. Very...not what you should be eating for your everyday meal.

Anyway, I'm stuck with this rice for now. I might attempt to make my own manju, but that's getting into realms beyond ambitious, since most recipes I can find don't take you from whole rice like the traditional method does (since that method is almost entirely ceremonial now, save a few small shops and country bumpkins). Instead, they tell you how to start with mochi rice flour. Obviously, since I have the whole rice and not the flour, this is not going to happen the easy way.

So, spinach and rice. For those unfamiliar, spinach and rice is a Greek recipe (also called "spanakorizo") using spinach, rice, a few other vegetables along with lemon juice and other seasonings. The largest hurdles for this recipe are that it calls for spinach, rice and mint. Well, the rice part wouldn't have been so hard had it not been for the mochi rice. I went ahead and used the mochi rice anyway. The extra gluten in the rice made the resulting dish a little gooey, but still delicious. I know they have spinach in Japan, but knowing which of the leafy vegetables is the spinach can be a bit difficult sometimes. I picked up a vegetable, hoped it was spinach and went on my way. It still may not have been spinach, but it worked well enough. The mint was going to be tougher. While some stores in Japan may have fresh mint or even dried mint, our local grocer is not one of them. I decided to experiment (as if the mochi rice and maybe-spinach wasn't experiment enough). A common leaf used in Japanese cuisine is shiso. Shiso comes in two colors. Red (actually a dark purple) and green. The red shiso is usually used for dying Japanese pickles and other foods while the green shiso is often eaten raw and whole as an accompaniment with rice, tempura fried, or shredded as a seasoning. Both red and green shiso are related to mint and have a mild minty flavor. I figured green shiso might work. It did! I'm so happy that it worked! So, basically, here are the steps (and ingredients) for Greek spinach and rice (I apologize for the lack of measurements, but I have no clue how much of what I use):

Spinach - (A lot...really. I don't think I've ever properly used enough spinach for this recipe, but I'm getting closer. I'd suggest at least two packages, if you're using pre-packaged spinach.) Chop this up, but not very small. 1 1/2" x 1 1/2" squares are probably best for the smallest pieces. Use the stems, too!
Uncooked white rice - (Any white rice will probably do, but I'd suggest not using mochi rice, since it makes the recipe more gooey. About 1/2 cup or 3/4 About 1/4 - 1/3 cup is good for two people.)
1 Tomato - Peeled, diced and mashed into a sauce. I use a mortar and pestil. You might find this easier with a blender. An even easier solution would be to buy a canned version at the store.
Onion - One half of the onion is enough. Chop it up. I like chopping it up really fine, but as long as you think the pieces are small enough, they probably are.
Garlic - One or two cloves, minced. Mince! Mince! Mince!
Olive oil - I prefer to not use extra virgin olive oil because I find it bitter. You may use whichever kind you like. Some other oils with mild flavors are okay, too.
Lemon juice - To flavor. The dish should be just slightly sour, but not overbearing.
Mint - Maybe 1 1/2 tsp, dry mint leaves? The flavor from the mint should never be too obvious. If you're in Japan, mince green shiso leaves are a good subtitute.
Oregano
Salt
Black Pepper (optional)
Basil (optional)

Directions:

  1. Put a little olive oil in a soup pot (or whatever pot you're cooking this in) and saute the onions and garlic until they start turning brown.
  2. Add the mashed tomato, stir a little bit and add water (I used about three-four bowls full of water, but I was using a small bowl. You're cooking rice, so you'll want a fair amount, but not too much).
  3. Also add the rice.
  4. Bring the water to a boil, then add the spinach, mint, lemon juice, oregano, salt and optional seasonings. Stir in the spinach. It may take a while to wilt down enough to fit, but don't worry too much about that. If it doesn't all fit at once, just add portions at a time. The rice takes a while to cook, so you don't have to worry too much about some of the spinach being undercooked.
  5. Turn down the heat slightly, cover and stir occasionally. Add water if it seems the liquid is getting too low. Once the spinach is properly wilted and has turned a more faded green, taste (try for at least some rice, a piece of spinach and some of the "broth") to see if you need to add any more of any seasoning. Never forget to stir occasionally and add more water when necessary. (I repeat this, because I forget it and am sometimes I'm very sorry for doing so)
  6. Did you forget to stir and check the water levels?
  7. Once the rice is soft (Soft, soft, soft! Maybe a little mushy, even!). Let most of the water evaporate out (aka "Remove the lid"). A little liquid is good. I even suggest leaving a little liquid.
  8. Serve and eat!
While this works best as a side dish in a hot meal, it can also serve as a small, one-bowl meal. It's also good as a leftover. The estimates I have for measurements are for two people (hopefully...maybe three). If they sound wrong to you, feel free to change them or make your own estimates. Next time I make this, I'll try to record how much of some of these things that I'm using.

Tuesday, September 1, 2009

Dogs - They are here and they wear shoes.

So, while I watch obnoxious Japanese children's shows, I shall make my first post to our blog. I'm still learning about how to live in Japan and I probably won't know everything even after our first year is out, but it's been a month and we haven't starved, so I'd say we're doing good.

While I knew that Japan has a lot of exciting new vegetables and even meat options in their grocery stores, I completely forgot that several of our common vegetables might be more difficult to find. At least on a daily basis. Our closest grocery store is only a short walk away, which is nice. Sometimes they don't have potatoes, red onions or some other bit of produce, but the store stocks fresh food, daily and discounts most meats and vegetables after dinner time. Some foods last a bit longer, so they only buy a stock of them once or twice a week. It's a small grocery store, though. We live in a rural area, so it's understandable. Just inconvenient, sometimes.

All this to say that I've been trying to learn how to cook some of the local vegetables so that I can still cook dinner if I go to the grocery store and can't find what I'm looking for. So far, I've attempted gobō (Japanese burdock) and goya (bitter melon) with varying results. This is primarily due to my recipes telling me very little in the matter of preparing the vegetables.

Gobō looks like a two to four foot long, extra-skinny, white carrot. It is typically sold and stored caked in mud (to help preserve it). To prepare, one washes away the mud and scrapes the skin away with a knife. It is important to scrape, not peel, the skin, as the nutritional value of the gobō is very close to the underside of the skin. That and gobō is very skinny. Peeling the vegetable could very well leave you with nothing. The gobō must then be placed in lemon water, salt water or some other solution to keep it from oxidizing. Next, it is the parboiling. This is important, since gobō is a bit woody. After that, you can do whatever you want with the gobō, so long as it tastes right. The recipe we used involved balsamic vinegar (a harder to find vinegar around here, but not as impossible as red wine vinegar). It was a bit vague in telling me how much of the vinegar went in and whether it was supposed to be a side dish or the main course (not as much as I put in, and not the main course). It was good, but next time I'll use it as a side dish and be slightly more conservative with the vinegar.

Goya looks, upon first glance, like a warty cucumber. It is regaled by the Japanese as being extremely healthy...and extremely bitter. It is sold when it is fully grown, but has yet to change color to be a ripe, bright orange. If you tried to eat it when it turned orange, no amount of cooking would remove the bitterness. We were given one of these by a woman whose husband grows them in his garden. We hadn't figured out what to do with it and it ended up rotting just as I found a recipe...so I went out to buy a new one so that we could at least say we tried a goya, even if it wasn't her goya. So, what our recipe never told us was that when you prepare a goya for cooking, you cut it open and remove all the seeds and pith and then slice the remaining shell into very thin, half-moon slices. Then, you soak the slices in salt water and "scrunch" them slightly. This helps remove some of the bitter oils. Most of the recipes involving goya will have you pan fry it in some way. When doing this, you must make sure that the goya is thoroughly cooked. I wasn't quite sure what "thoroughly cooked" meant, with goya, so it ended up being undercooked and a horribly bitter dish. Next time, I will keep what I have learned in mind.

I found some broccoli the other day and was extremely satisfied to make a boring chicken and broccoli stir-fry.

Today, while going to the grocery store (they had white peach juice and melon bread today!), I passed a tiny, long-haired dachshund, slowly tottering after its master. On the way back, I passed a rather large weimaraner that appeared to be walking in a rather odd manner. When I got closer, I realized that the dog was wearing shoes. I wondered whether this dog's owner felt that the traditions requiring people to wear shoes outdoors and keep them off while inside should apply to their pet as well. After all, the same dirt that would be an a human's feet would be on a dog's feet as well.

With all that rambling done, I must now go make dinner.